
Garbage Disposal Troubleshooting: Reset, Unjam, and Know When to Replace

Maria Solano
Former appliance warranty claims adjuster turned investigative repair journalist. Maria's 'What Went Wrong' teardown series has made her the most feared woman in the white-goods industry.
Garbage Disposal Troubleshooting: Reset, Unjam, and Know When to Replace
The garbage disposal is the most DIY-repairable appliance in the kitchen. The most common failures — a jam, a tripped overload, a minor leak — don't require a service call. They require a flashlight, an Allen wrench, and 10 minutes.
This guide covers everything from the simple reset to wiring issues in older units, plus an honest look at when replacement makes more sense than continuing to troubleshoot.
Safety first, every time: Before doing anything with a garbage disposal, turn off the wall switch and confirm the unit is not powered. For any work involving the wiring, flip the circuit breaker. Never put your hand inside a disposal — jammed or not.
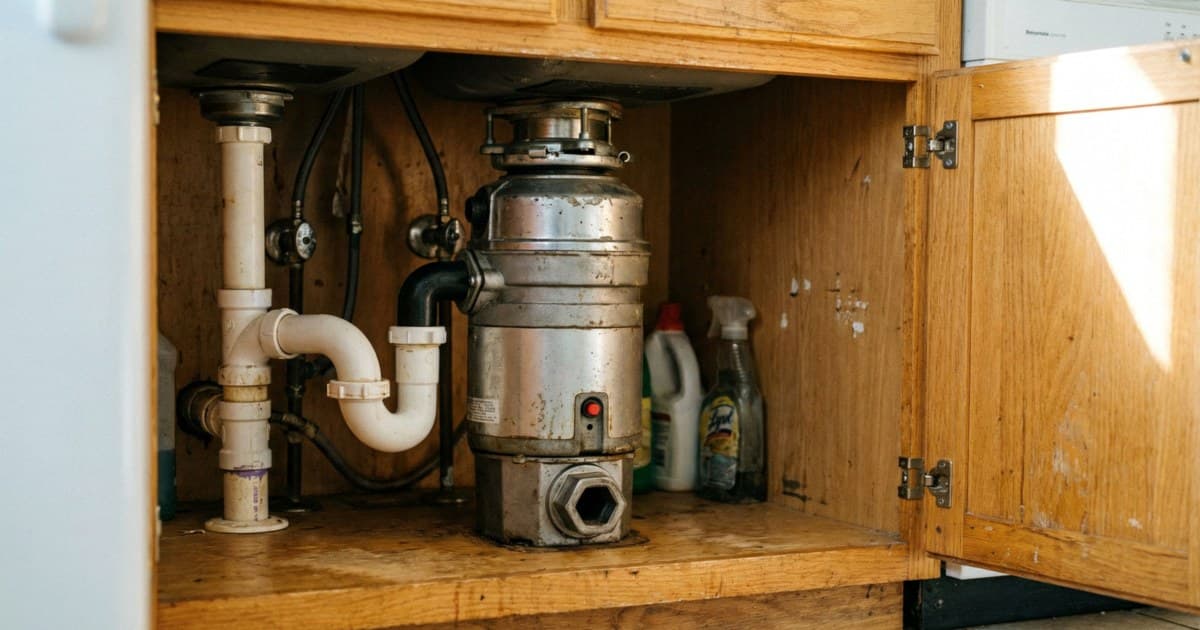
Symptom 1: Disposal Won't Turn On, No Sound
Step 1: Check the reset button.
The overload protector on the bottom of every disposal unit includes a reset button — usually a red or black button about the size of a pencil eraser, protruding from the center of the base. When the motor gets overloaded (too much food waste, stalled flywheel), this button trips automatically and cuts power to the motor.
Push the button firmly until you feel or hear it click. If it was tripped, it will engage noticeably. Wait 5-10 minutes if the motor was running hot before the shutoff — the thermal overload needs to cool before the reset will hold.
Try the disposal again after resetting.
Step 2: Check the wall switch.
A bad wall switch is more common than most people think. With the reset button confirmed functional, test the switch by using a multimeter to check continuity across the switch terminals with it in the "on" position. No continuity means the switch failed — a $10 fix.
Step 3: Check the GFCI outlet.
Many disposals plug into a GFCI outlet under the sink. A tripped GFCI cuts all power downstream and looks identical to a disposal failure. Find the GFCI outlet (it has Test and Reset buttons on its face) and press Reset. If it won't reset, something on that circuit has a ground fault.
Step 4: Check for wiring issues.
In older disposals that are hardwired (no plug), loose or corroded wiring connections are a common cause of "no power" symptoms. This is more common on units over 10 years old, or in under-sink environments with moisture exposure. If you're comfortable with basic electrical work and have confirmed the circuit has power, check the wire nut connections inside the disposal's wiring compartment. Loose connections show corrosion or the wire backing partially out.
Symptom 2: Disposal Hums but Won't Spin (Jammed Flywheel)
This is the most common disposal problem. The motor is receiving power and trying to run, but the flywheel is stuck. This happens when a bone fragment, a fruit pit, a small utensil, or similar debris gets wedged between the flywheel and the grinding ring.
Do not leave the disposal running while humming. Continuous humming stalls current through the motor windings, which can burn out the motor if you let it run more than a few seconds.
To clear the jam:
- Turn off the wall switch and confirm no power.
- Locate the hex port on the bottom center of the disposal. It accepts a 1/4-inch Allen wrench (hex key). InSinkErator includes a wrench with every unit — it's sometimes still taped to the side of the unit. Moen and other brands: a standard 1/4-inch Allen wrench works.
- Insert the Allen wrench and work it in both directions. You're manually rotating the flywheel to break loose whatever is jammed. You'll feel resistance, then the jam releasing. On stubborn jams, apply steady pressure in one direction for 30 seconds rather than rapid back-and-forth.
- Once the flywheel moves freely, look under the sink with a flashlight. Do not reach in — use tongs or pliers to extract any visible debris.
- Press the reset button (it likely tripped during the hum event).
- Restore power and test.
If you don't have the hex wrench that came with the disposal (it gets lost constantly), you can also use a broom handle through the drain opening from above as a lever to manually rotate the flywheel. Insert it and push/rotate. This is a legitimate field fix when you're missing the proper tool. Once the jam is clear, use tongs to remove debris before running the unit.
Symptom 3: Disposal Runs but Makes a Loud Grinding or Rattling Noise
Rattling: Something metallic is loose in the grinding chamber. A bottle cap, a screw, a fork tine. Turn off power, use a flashlight to inspect the chamber, and use tongs or needle-nose pliers to remove the debris. Never use your hand.
Grinding noise (metal on metal): The grinding plates or impellers are worn, or a hard object has damaged the grinding ring. This noise is mechanical wear — the disposal is still functional but degrading. In an older unit (8+ years), this is a signal that replacement is coming.
Rumbling or vibration from the motor: On older disposals, the motor bearings wear over time. A rumbling, vibrating disposal that runs but sounds rough is usually on its last legs. Bearing replacement isn't practical on a disposal — replacement is the repair.
Symptom 4: Disposal Leaks
Leak location determines the repair:
Leak from the top (sink flange area): The plumber's putty seal between the disposal mounting flange and the sink drain has failed. This is a somewhat involved fix — you need to remove the disposal, clean the old putty off, apply new putty, and remount. Or simply reseat the mounting ring if the disposal has worked itself loose.
Leak from the side (dishwasher inlet or drain outlet): The rubber gasket or hose clamp at the connection point has failed. Tighten the clamp first. If the connection continues to leak after tightening, the rubber gasket is deteriorated — replace it.
Leak from the bottom (motor housing area): This is an internal seal failure between the motor and the grinding chamber. There is no practical repair for this. A disposal leaking from its base body has failed internally and needs replacement.
An easy way to identify the leak source precisely: dry the entire area under the sink completely. Run the disposal with a full flow of water for 30-60 seconds, then let it sit. Check with a dry paper towel against each connection point — top flange, side connections, bottom. The wet spot identifies the leak source cleanly without guessing.
Wiring Issues in Older Units
Disposals installed in the 1990s and early 2000s sometimes develop wiring problems specific to that era — aluminum wiring connections to copper disposal leads, deteriorated wire insulation in hot under-sink environments, and corroded push-in wire connectors that were used widely in that period.
Common wiring failure symptoms: disposal that works intermittently, trips the breaker rather than the internal reset, or causes the GFCI to trip even when the disposal itself is not running.
For hardwired disposals with wiring faults, I always recommend pulling the unit rather than trying to repair wiring in place. You're in a tight cabinet, often upside-down, with limited access. Remove the disposal to a workbench or counter, inspect and repair the wiring with proper access, and reinstall. It takes longer but the result is actually safe.
If the disposal is over 10 years old and showing wiring issues, see the replacement section below.
Connecting to the Kitchen Appliance Cluster
The disposal drains into the same drain system as your dishwasher and kitchen sink. A fully packed or failed disposal can back up the dishwasher drain and cause dishwasher drain errors. If you're troubleshooting a dishwasher that won't drain, check the disposal first — a clogged drain outlet connection is a common root cause. See our Whirlpool dishwasher not draining guide for a full dishwasher drain diagnostic.
When to Replace Instead of Repair
Replace the disposal when:
- It leaks from the motor body (bottom). Internal seal failure. Not repairable.
- It's over 10-12 years old and requires repeated resets. The thermal overload is wearing out. Motor is end-of-life.
- The grinding mechanism is worn. Food goes in, nothing happens, no jam present. Grinding plates are smooth from wear.
- The motor is burning. Electrical smell during operation. Worn motor windings.
- The unit is a budget model and over 5-6 years old. InSinkErator Badger series, Waste King economy series — these are not designed for long service life. Replacement is usually cheaper than any repair.
Replacement is a reasonable DIY project. InSinkErator units use a 3-bolt twist-lock mounting that's been the same design for decades. Most replacements take under an hour with basic tools.
Why is my garbage disposal humming but not spinning?▾
Humming without spinning almost always means the flywheel is jammed by a foreign object. Turn off the power, insert a 1/4-inch Allen wrench into the hex port on the bottom of the disposal, and work it back and forth to free the jam. Do not put your hand into the disposal. Once the jam is cleared, hit the reset button and try again.
My garbage disposal won't turn on at all — no sound, no hum. What's wrong?▾
Start with the reset button on the bottom of the unit — press it firmly until you feel it click. If the disposal still doesn't respond, check the wall switch and the outlet's GFCI if one is present. Older disposals may have wiring failures that show no response at all — that points to a wiring fault or failed motor.
How long should a garbage disposal last?▾
A quality garbage disposal (InSinkErator Evolution series, Moen GX/EX series) lasts 10-15 years with normal use. Budget models last 5-8 years. Once a disposal is past 10 years and leaking from the body or requiring repeated resets, replacement is almost always more economical than repair.
Need a repair professional?
Get free quotes from verified technicians in your area.
Find a Pro Near You